![Logo - Secondary White-1.png]](https://help.askcody.com/hs-fs/hubfs/Logo%20-%20Secondary%20White-1.png?height=50&name=Logo%20-%20Secondary%20White-1.png)
When entering the AskCody Management Portal for the first time, we would like to know a little more about your organization's general information, such as your Locations, Language and Time, SMS Sender Name, and Domain. Filling in this information will secure the foundation of your platform and minimize the risk of mistakes later on when taking more of the platform into use.
To understand how AskCody is handling locations, languages, and time across a global organization it is important to mention that it is based on international standards and best practices. The AskCody Platform is built to support different languages and time/date formats across different locations and time zones in your organization and has a defined hierarchy based on Global Level, Location Level, and User Level. Read more about the different Levels here.
Info
AskCody supports all international time zones and the following languages:
English, Danish, Spanish, German, French, Swedish, Norwegian, Dutch, Italian, Finnish, Japanese and Polish.
1. Locations
This step guides you to set up your locations across your organization. Locations are used to define your different buildings, offices, floors, and in which cities, regions, or countries. What to call your locations will differ depending on your specific organizational case, but you can watch this Webinar to get some inspiration, best practices, and learn how to find the best naming convention using a specially developed framework.

In the AskCody Portal, a "Default" location is already created when you sign up.
We recommend you go edit the current location so it fits your organization, and add other locations if needed.
If you would like to have different languages and times on some of your locations (Location Level), correct it on the specific locations.
Note: Language Time set on a location applies only to that specific location, and the AskCody modules used on that location, including the users on that location.

|
2. Language and Time
(Global Level)
Your account needs to have a Global set Locale* and Time Zone which matches your organizational standards, in case a Location Level setting is removed. By setting the Global Level Locale* and Time Zone ensures the Platform has a fallback setting that have been chosen by you and not AskCody.
*Locale is a combination of both language and the time/date format.
Example: English (United Kingdom) uses the 24-hour clock format and English(US) uses the 12-hour clock format. Besides the 24- or 12-hour clock and AM/PM the Locale also sets the date format, e.g. 14/02/19 or 02/14/19.
- Log in to the AskCody Portal. Choose EU or US.
- Click on the Admin Center at the left panel
- Click on Account, and then on Language and time.
- Click on Locale to choose the Global Level language and time/date format for your account.
- Select Global level time-zone.
- Click Save when done.

3. SMS Sender Name
(Global Level)
It is possible to send SMS's from the AskCody Platform and the SMS Sender Name is a Global Level setting, therefore it is important to set this up as an Organizational Account Setting. The "Default" SMS Sender Name is AskCody, so unless you change it to something that matches your organization, the SMS's will be sent from AskCody. Follow the steps below or read more about SMS Sender Name here.

- Log in to the AskCody Portal. Choose EU or US.
- Click on the Admin Center on the left panel
- Click on Account, and then on SMS Sender Name.
- Type in the name of your organization.
- Click Update when done.

4. Domains
(Global Level)
Domains are typically the organizations name showed after the @domain in an email address, like cecilie.k.als@askcody.com. Domains are build to make the AskCody Platform help you perform smarter and be more efficient, because the platform automatically detects if the email is internal or external. This is smart for example when an employee uses the Bookings Add-in for Outlook to automatically find an external meeting room if the AskCody platform detects an external email address among the invited attendees. Read more about Domains here.

- Log in to the AskCody Portal. Choose EU or US.
- Click on the Admin Center on the left panel
- Click on Account, and then on Domains.
- Click on the button Add.
- Type in your Domain Name.
- Click Add when done.
- (Optional) If you have more than one Domain, or have several sub-domains, repeate the process. Read more about sub-domains and combining multiple Exchange Server account using Domains here.
5. Enable in-app purchases for easier scaling of licenses
To support easier scaling and improved license management, AskCody offers the option to enable in-app purchases in the AskCody Management Portal. When enabled, this feature allows admins to purchase additional licenses on demand—directly within the platform—without having to contact AskCody.
This can be especially helpful as your organization grows or your needs evolve post-implementation.
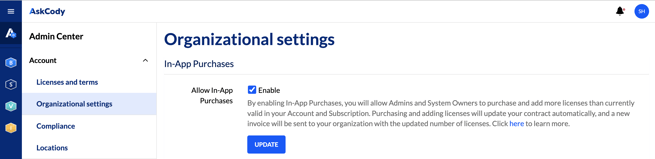
To enable the feature, a user with the AskCody Owner role can adjust the settings in :
Admin center --> Organizational Settings --> Allow in-app purchases
Read more about in-app purchases in this article