![Logo - Secondary White-1.png]](https://help.askcody.com/hs-fs/hubfs/Logo%20-%20Secondary%20White-1.png?height=50&name=Logo%20-%20Secondary%20White-1.png)
This guide is designed for customers currently using ADSI (Active Directory Server Integration, or AADFS) or AADI (AskCody Active Directory Integration) to manage user synchronization.
The goal is to help you migrate to the new App Provisioning (SCIM-based) integration using Microsoft Entra ID.
Permission Requirements
To set up App Provisioning, you need permissions in both Microsoft Entra ID and AskCody, and you must use the same account for both.
-
Microsoft Entra ID: Global Administrator permissions to register the AskCody Enterprise Application, approve API permissions (SCIM and Graph access), and start the provisioning service.
-
AskCody: Owner access to complete the setup in Admin Center → Integrations → Entra ID Integration.
When prompted to sign in with Microsoft during setup, use the same account you're logged into AskCody with. Signing in with a different Microsoft account will cause the setup to fail. This account should be a global admin in Exchange, and have the AskCody Owner role within AskCody.
The migration process is very similar for both AADI and ADSI users. The main difference is that ADSI customers must stop the ADSI service running on their Exchange Server before starting the setup.
Contents of this guide
- Create and Configure the Enterprise Application
- ADSI(AADFS)-Specific Step
- AADI Migration Path
- Wait for the Groups to Sync
- Start the Provisioning Service from Entra ID
- Verify the Migration
Create and Configure the Enterprise Application
Start by setting up the Enterprise Application in Microsoft Entra ID.
This creates the connection that allows AskCody to automatically manage users and groups through SCIM.
To create the application, follow this guide. However, it is important to not start the provisioning service until after the group population stage of this guide, as it may slow the first sync cycle down.
ADSI(AADFS)-Specific Step
This step is only relevant if your organization is currently using our integration with Active Directory Server. If you are not, please refer to the next section.
If your organization is currently using ADSI, there’s one extra step before you proceed:
-
Stop the ADSI service from your Exchange Server.
This ensures there’s no overlap or conflict between the legacy ADSI sync and the new SCIM-based provisioning. -
Once stopped, continue following the same Entra ID setup guide linked above (click here to go directly to it)
Do not restart the ADSI service after migration. The SCIM integration fully replaces it. After having successfully migrated to the SCIM-managed user synchronization, it is safe to uninstall the AADFS (AADI) service from your organization's Exchange Environment.
Migrate from AADI to App Provisioning
If you’re currently using AADI, the process is nearly identical, but you should not start the provisioning service from Entra ID yet.
Once you’ve completed the Enterprise Application setup:
-
Log in to your AskCody Admin Center
-
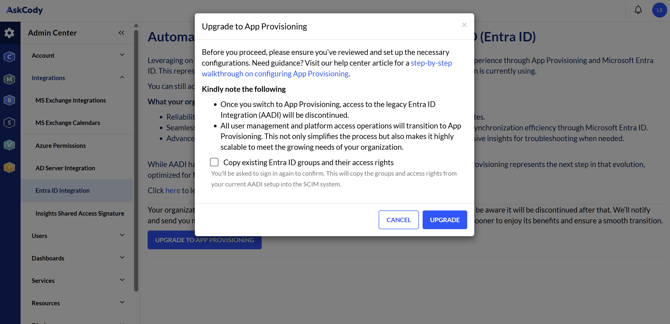
Navigate to Integrations → Entra ID Integration. You should see the following page:

-
Click Upgrade to App Provisioning
-
In the confirmation flow, choose “Copy existing Entra ID groups and their access rights” if you want to reuse your existing group and access configurations (if you will give users the same level of access as you have been giving them until today).
-
Click Upgrade to continue
-
Approve the authentication flow, which must be accepted by a Global Administrator in Exchange
After completing these steps, you’ll be redirected to a Groups table in AskCody.
Initially, the table may appear empty. That’s expected. Make sure to refresh the page after a few minutes, as your existing groups will start appearing.
Wait for Groups to Populate
Check back after about 5 minutes to see the synchronization progress.
-
If you see a warning banner, the migration is still running.
-
When the banner disappears and all groups are listed, the migration is ready for provisioning.
The time required depends on the number of groups in your organization. Large environments may take slightly longer to complete.
Start the Provisioning Service from Entra ID
Now it’s time to start the new provisioning process in Entra ID:
-
Open Microsoft Entra ID
-
Go to Enterprise Applications
-
Locate the application created for AskCody
-
Click Start provisioning
The provisioning service will now begin matching users and groups with AskCody and run its first full synchronization cycle.
The first sync takes longer because it performs a complete match between users, groups, and roles.
Future incremental syncs will run much faster.
Verify the Migration
You can monitor the status of each group directly in the AskCody Admin Center.
Each group will display whether it’s:
-
Active: The group is up to date
-
Applying Changes: Your organization has recently made changes to the access configuration of the group, and these are being applied to the users within that group
- Pending Entra ID Changes: Your organization has made changes to the group's memberships in Entra ID, and these are currently being processed and updated into AskCody
This allows you to confirm that synchronization is working as expected.
Is your organization managing Cost Centers from Entra ID?
If your organization stores users’ cost center information in Microsoft Entra ID and you’d like that data to flow into AskCody automatically, you can do this through SCIM user provisioning by mapping your Entra ID extension attribute to AskCody’s costCenter field.
Click here to learn how: Synchronize Cost Center from Entra ID with AskCody