![Logo - Secondary White-1.png]](https://help.askcody.com/hs-fs/hubfs/Logo%20-%20Secondary%20White-1.png?height=50&name=Logo%20-%20Secondary%20White-1.png)
With AskCody, you can automate the user management and platform access by synchronizing changes in Microsoft Entra ID into the platform. The user synchronization occurs through Azure App Provisioning directly in the Entra ID portal and it consists of 5 steps:
- Requirements
- Create and setup an Enterprise Application for user provisioning within Entra ID
- Configure the Enterprise Application
- Start the synchronization and manage users with Entra ID
- Manage user access in AskCody
When done with the setup, you can:
Requirements
Roles required in Entra ID
In order to be able to perform the following configuration steps within the Entra ID Portal, the user needs to have either Application Administrator, Cloud Application Administrator, or Global Administrator roles within Entra ID.
Roles required in AskCody
Make sure your AskCody user has either the "AskCody Owner" or the "Integration Administrator" roles in the AskCody Management Portal.
Only security-enabled groups in Entra ID can be integrated
Make sure that the AD groups you want to sync are security-enabled, otherwise, the groups will not be synced. Also, please be aware that nested groups are not supported.
Azure Permissions need to be granted
Make sure to have granted Azure Enterprise Application Permissions to AskCody in your tenant ID.
Entra ID groups name convention recommended for integration
For ease of management, we recommend that the Entra ID groups you plan to integrate fit with the AskCody user role hierarchy. Examples of recommended group names: AskCody Owners, Facility Management, Copenhagen Reception, IT Support, etc.
Please make sure your organization has either an Entra ID P1, or P2 paid license.
Create and set up the Enterprise Application
Login to your Azure Portal account and navigate to the Entra ID section.
Continue to the Enterprise applications section to create a new non-gallery. To do this, you can follow these steps:
- Follow this URL, which will take you to the Enterprise Applications section of Microsoft Azure: https://portal.azure.com/#view/Microsoft_AAD_IAM/AppGalleryBladeV2
- On the toolbar at the top, click on New Application

- On same toolbar at the top, click on Create Your Own Application

In here, give the Application a name. We recommend giving the application a name that makes it recognizable amongst your other Enterprise Applications. Examples: “AskCody User Provisioning” or “SCIM Provisioning”. This guide will use an application with the name “AskCody Provisioning”.
Here are the full steps described above in sequence:

(Optional) To make the application even more recognizable, we suggest you add the following logo to it:
Click to Download AskCody Logo
To do so, save the image above in your computer, then navigate to the Properties section of the Enterprise Application and click “Select a file” under the “Logo” section:


In here, upload the logo provided above. It should become the application logo.
When done, click on “Save” at the top left of the current screen to save the changes.

Info
Although it is possible to use more than one application to provision users to AskCody, we strongly recommend using only one application for this purpose. Utilizing multiple applications can create additional work in maintaining or modifying the user synchronization service, potentially leading to misconfigurations and unsynchronized users.
If your organization absolutely needs to use more than one application to provision user data to AskCody, it’s important to understand that a group can only be provisioned from one application. Consequently, synchronizing the same Entra ID group into AskCody from more than one Enterprise Application can result in unexpected synchronization outcomes.
Configure The Enterprise Application
The next step is to configure the Enterprise Application to enable the SCIM (System for Cross-Domain Identity Management) user provisioning.
To do so, go to the Provisioning section of the newly created application to connect it to your AskCody account:

Click on “New configuration”:

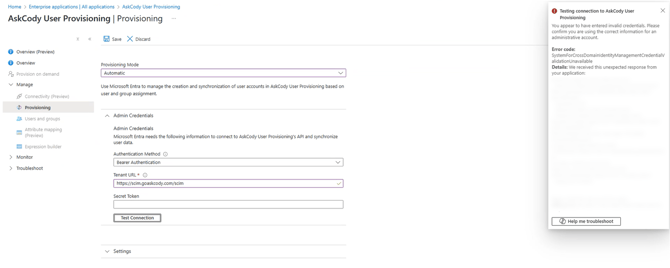
Make sure to set:
- Provisioning Mode: Set to Automatic
- Authentication Method: Set to Bearer Authentication
- Tenant URL:
- For EU Customers: https://scim.onaskcody.com/scim
- For US Customers: https://scim.goaskcody.com/scim
- Secret Token: Make sure to leave blank
Click on Test Connection to confirm that the connection between your Entra ID and AskCody is functional. After confirming that the connection works, click Save. Once Save is clicked, additional options will appear below the Admin Credentials option.
If during the connection test you happen to get an error, such as the one on the picture below, please make sure that your organization has granted Azure Permissions to AskCody, and try again:
After testing the connection, click on “Create at the bottom”:

Please be aware that there are currently two coexisting versions of this portal. In the newer one, you will see a "Create" button as described above, in the older one, you will see a "Save" button at the top left:

If your organization is on the old version, please click on "Save" at the top left corner at this step, and continue with the guide below.
You should be taken to the Overview page of the Enterprise Application:

In here, click on "Provisioning" at the left sidebar:

Then click on the "Mappings" section to start setting up the Attribute mapping, which will ensure that data between Entra ID and AskCody is always aligned.:

Configure Attribute Mapping
In order to ensure that the user and group information is created and updated correctly in AskCody, it is necessary to map the attributes that contain the relevant data in Entra ID to user attributes in AskCody.
There are two ways to configure this mapping, and you only need to use one of them:
- Option 1: Automatically (recommended). You paste a ready-made schema, and the mapping is configured for you. This is the fastest and least error-prone method. This method is included in this article.
- Option 2: Manually. You edit each group and user attribute yourself. This method is explained in the following article: How to Configure Attribute Mapping Manually for Microsoft Entra ID User Provisioning (SCIM)
Note: Choose one option only. Do not run both, as configuring the mapping twice leads to duplicated or conflicting settings. If you are unsure, use Option 1.
Option 1: Configure attribute mapping automatically (recommended)
Click on Provision Microsoft Entra ID Groups:
In here, click on the Show advanced options box, and then on Review your schema here at the bottom:
In here, you can copy and paste the text contents of this JSON file, and click on Save at the top. If there were any contents in here prior to pasting the new JSON configuration, please delete all of it, and replace it for the contents of the JSON file linked above.
Then on the confirmation message, click "Yes".

You will be redirected to the attributes page:

Your attribute mapping process is done.
You can always review the attribute mapping (on Users, or Groups) in case you are curious as to how attributes got mapped automatically.
Optional: Sync Cost Centers from Entra ID to AskCody
If your organization stores cost center information in Microsoft Entra ID (for example in an extension attribute), you can sync it into AskCody through SCIM. Add a user attribute mapping from your Entra ID extension attribute to:urn:ietf:params:scim:schemas:extension:enterprise:2.0:User:costCenter
This ensures employees are automatically linked to the correct cost centers in AskCody and see a read-only cost center when placing service requests.
Follow the steps here: Sync Cost Centers from Microsoft Entra ID to AskCody (SCIM)
Adding Groups
Please note that Azure App Provisioning does not support nested groups, therefore it is not possible to use nested groups as the source for synchronizing users with AskCody. For more information, please refer to Microsoft's knowledge base.
For this step, please make sure to have already created groups within your organization’s Microsoft Entra ID and manage user memberships according to the desired access.
Examples for potential group names and members
- AskCody Owners: Users who have full access to the AskCody platform.
- AskCody Users: Users who have access to the AskCody Add-ins, and the AskCody Portal.
- AskCody Visitor Admins: Users who have access full access to the Visitors section of the AskCody platform.
- AskCody Receptionists: Users who will have end-user level access (not admin) to the Visitors section of the AskCody platform.
- AskCody Services Admins: Users who have access full access to the Services section of the AskCody platform.
- AskCody Services Providers: Users who will have end-user level access (not admin) to the Visitors section of the AskCody platform.
To add the groups from your Entra ID to the AskCody Platform please follow these instructions:
Under “Enterprise Applications”, find the application you previously created for provisioning Users and Groups into AskCody. The application used for this example is called “AskCody Provisioning”
- Click on “Provisioning”
- Go to “Users and groups”
- Click on “+Add user/group”
- Select the Groups you wish to add.
- When done, click on “Assign”
Note: Make sure to exclusively add groups instead of individual users, as this will make the configuration easier to maintain.
Here is a video example of how to perform the steps above:

After doing these steps, the configuration for your App Provisioning application for AskCody is now done. The next steps are to start the provisioning service to automatically add the users into the AskCody Platform.
Note
Do not start provisioning users yet
Start the synchronization and manage users with Entra ID
After having done the initial set up for the Enterprise Application, it is necessary to log into your AskCody account, and enable provisioning from there. Please follow these steps to do so:
- Login to AskCody
- Click on the Admin Center icon at the top left corner of the AskCody Management Portal:

- Click on the Entra ID Integration menu option within the Integrations section:

- In here, you will have the possibility to enable App Provisioning for your organization. Click on “Get Started”, and then on the “Enable” button in the pop-up:


- After clicking on “Enable”, you will be taken to your Entra ID Groups page, where you are able to see all of the User Groups that are synchronized into AskCody from Microsoft Entra ID.
Please note that groups are automatically populated in this list based on the configuration of the Enterprise Application you are using for user synchronization within your organization’s Entra ID portal:
Please note that groups will not appear here until we start provisioning them from Entra ID, which are the next steps. -
Navigate to the Application you previously created for App Provisioning within the Enterprise Applications section in Entra ID. The application used on this guide is called “AskCody User Provisioning”, and click on it. You will be taken to the overview page. In here, click on "Start Provisioning" at the top:

After doing this, the provisioning service will start running and start creating, or updating the user and group data from Entra ID into AskCody.
Manage User Access in AskCody
After having started provisioning Groups from Azure, Users should start appearing in your organization’s AskCody account within a few minutes, and Groups should start appearing on the Group list in the Entra ID Integration section within AskCody:
By clicking into one of the groups, you are able to see the status in terms of memberships, assignments and role grants. This will determine the level of access that users will have to the AskCody platform:
The "Status" indicates the current status of the group, and can be the following:
- New: The group has been created from Azure and it is still yet to be configured to assign the level of access that their members should have in AskCody.
- Waiting sync from Azure: The group was added as a migration from a legacy user synchronization integration with Entra ID and is awaiting for updates to be sent from Entra ID (very likely, the Entra ID provisioning hasn't been started yet). After the group has been updated for the first time, this status is not displayed again on that group.
- Applying changes: The group is currently applying changes made to the access levels in AskCody (Roles, Cost Center Memberships, Reception Memberships, Reception Assignments and/or Service Provider Memberships)
- Active: The group has finished applying changes made in terms of access levels in AskCody, and continues to get updates from Entra ID.
In order to edit the access that the group members have within AskCody, click on the “Edit” button. In here, you will see the options for assigning different levels of access to the AskCody platform:
In each of the fields, choose as many options as needed from each of the drop-down menus. These menus display information from your AskCody account and choosing them here will apply these settings to all of the users of the current group you are editing. For this example, we are editing a group called “AskCody Owners”, which has 5 users that will get the role grants, memberships and assignments selected.
Note
Click here to see the full list of roles and the access they give to the AskCody platform.
When finished configuring the access, please click on “Update”. This will provide users with the desired level of access to the AskCody Platform.
- Repeat the same process for the remaining groups from the Entra ID Groups list in AskCody
When finished, you are done setting up the Entra ID integration, and changes to users and groups will be added as they are made in Entra ID.
Making Changes to the Configuration
To make changes to the configuration, simply add or remove groups as outlined above in this guide, to the Entra ID application, and they will appear automatically in the list of groups in AskCody. Then, you can configure the level of access of the newly added groups by following the same steps outlined above in this guide.
What happens when I remove a user from the sync's scope in Entra ID?
When a user gets its membership revoked to the groups within the Provisioning scope, the user will be disabled in AskCody, losing all platform access. If the user is re-added in the future, it will get the level of access determined by its group memberships in Entra ID.
Users are also disabled if the following conditions are not met:
- The user does not have an email
- The user does not have the User Principal Name attribute defined in Entra ID
- The user does not have the Given Name attribute defined in Entra ID
- The user does not have the Surname attribute defined in Entra ID
- The user's account is not enabled in Entra ID
How fast does data get updated into AskCody?
After having run the initial cycle, the service will run every 40 minutes, and will update data on every cycle it runs, if needed. For the initial cycle, the job time depends on many factors, including the number of users and groups in scope for provisioning, and the total number of users and group in the source system. The first sync between Entra ID and AskCody can happen as fast as 20 minutes or take as long as several hours. The time depends on the size of the Entra ID directory and the number of users and groups in scope for App Provisioning. A comprehensive list of factors that affect initial cycle performance are summarized below:
- The total number of users and groups in scope for provisioning.
- The total number of users, groups, and group members present in the source system (Entra ID).
- Whether users in scope for provisioning are matched to existing users in the target application or need to be created for the first time. Sync jobs for which all users are created for the first time take about twice as long as sync jobs for which all users are matched to existing users.
- Number of errors in the provisioning logs. Performance is slower if there are many errors, and the provisioning service has gone into a quarantine state.
To learn more, please refer to the following article: Find out when a specific user is able to access an app in Azure Active Directory Application Provisioning - Microsoft Entra | Microsoft Learn
This table represents an approximate length for the cycle times, depending on the use case:
|
Scope configuration |
Users, groups, and members in scope |
Initial cycle time |
Incremental cycle time |
|
Sync assigned users and groups only |
< 1,000 |
< 30 minutes |
< 30 minutes |
|
Sync assigned users and groups only |
1,000 - 10,000 |
142 - 708 minutes |
< 30 minutes |
|
Sync assigned users and groups only |
10,000 - 100,000 |
1,170 - 2,340 minutes |
< 30 minutes |
|
Sync all users and groups in Entra ID |
< 1,000 |
< 30 minutes |
< 30 minutes |
|
Sync all users and groups in Entra ID |
1,000 - 10,000 |
< 30 - 120 minutes |
< 30 minutes |
|
Sync all users and groups in Entra ID |
10,000 - 100,000 |
713 - 1,425 minutes |
< 30 minutes |
|
Sync all users in Entra ID |
< 1,000 |
< 30 minutes |
< 30 minutes |
|
Sync all users in Entra ID |
1,000 - 10,000 |
43 - 86 minutes |
< 30 minutes |