![Logo - Secondary White-1.png]](https://help.askcody.com/hs-fs/hubfs/Logo%20-%20Secondary%20White-1.png?height=50&name=Logo%20-%20Secondary%20White-1.png)
Teams change. A new department needs access, you create a group for receptionists or service providers, or a group is no longer needed. This article is for IT Admins and AskCody Owners who already run the automatic user sync with Microsoft Entra ID (former Azure AD), also called SCIM-based App Provisioning. It shows you how to add a group and give it access, how to change what a group can do, and how to remove a group safely.
If you have not set up the user sync yet, start with How to set up automatic user management with Microsoft Entra ID.
Requirements for adding a new group
In Microsoft Entra ID
- The user sync is already running. The AskCody provisioning application is set up and provisioning has started.
- One of these Entra ID roles: Application Administrator, Cloud Application Administrator, or owner of the AskCody provisioning application.
- Microsoft Entra ID P1 or P2. Microsoft requires this to assign groups to an application.
In AskCody
- The Owner or Integration Administrator role in the AskCody Management Portal.
About the groups you add
- Use a flat group. The sync only reads users who are direct members of the group you assign. Members of a group inside that group (nested groups) are not synced.
- Use a security group. The group must be security enabled.
- Check the user profiles. Every member needs an email, a User Principal Name, a given name, and a surname in Entra ID. Users missing any of these are not created in AskCody.
Note: Always add groups, not individual users. Groups keep access easy to manage: when someone joins or leaves the group in Entra ID, AskCody follows automatically.
Add a new group
Step 1: Assign the group to the AskCody provisioning application
- Open the Microsoft Entra admin center.
- Go to Enterprise applications and open the application you use for AskCody provisioning.
- Select Provisioning, then Users and groups.
- Click +Add user/group.
- Select the new group and click Assign.
Your new group should appear in the list of "Users and groups" page. In case it does not, try refreshing the page.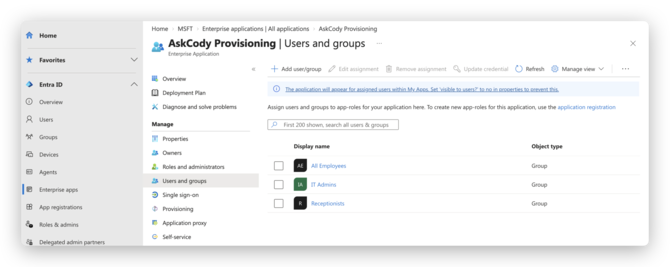
The group is now in scope. You do not need to restart provisioning. The next sync cycle picks it up automatically.
Step 2: Push the group to AskCody now (optional)
The next sync cycle can take up to about 40 minutes to start. If you want to check that everything works right away, use Provision on demand.
- In the same enterprise application, go to Provisioning and click Provision on demand.
- Search for the new group.
- Select up to five members of the group.
- Click Provision at the bottom of the page.
- Check that all four steps show Success. If a step fails, open the details, fix the user's profile in Entra ID, and try again.
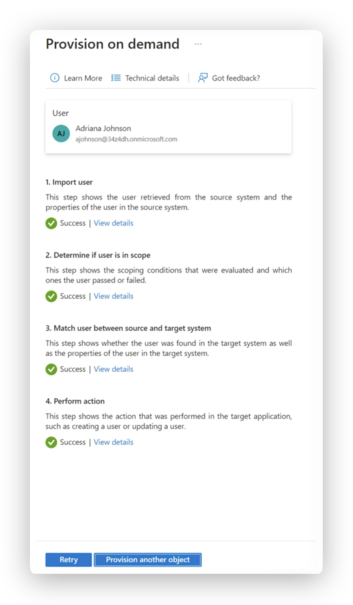
Note: Microsoft limits Provision on demand to five members of a group at a time. You do not need to provision every member this way. Use it to confirm the group arrives in AskCody, and let the regular sync bring in everyone else.
Provision on demand requires the Application Administrator role or ownership of the AskCody provisioning application in Entra ID.
Step 3: Give the group access in AskCody
A new group arrives in AskCody with no access settings. You decide what its members can do.
- Open the AskCody Management Portal and go to the Admin Center.
- Under Integrations, select Entra ID Integration.
- Find the new group in the list. Its status is New.
- Click Edit on the group.
- Choose the access the group should give its members. You can select several options in each drop-down: role grants, cost center memberships, reception memberships, reception assignments, and service provider memberships.
- Click Update.
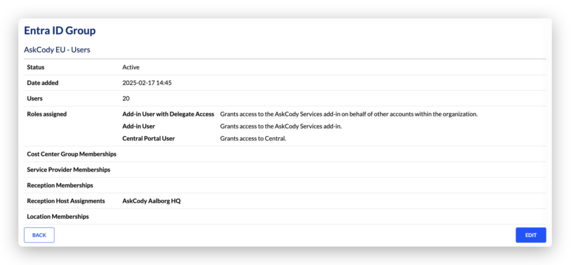
The status changes to Applying changes while AskCody updates the members. When it shows Active, the group is done, and every member has the access you chose. New members you add to the group in Entra ID later get the same access automatically.
To see what each role allows, read User Roles and Memberships on the AskCody Platform.
Change what a group can do
You do not need to remove and add a group to change its access. Edit it in AskCody instead.
- In the Admin Center, go to Integrations and select Entra ID Integration.
- Click Edit on the group.
- Add or remove options in the drop-downs.
- Click Update.
The change applies to every member of the group. The status shows Applying changes until it is done, then Active.
Remove a group
Remove a group when its members should no longer get access to AskCody through it.
Before you remove a group
- Check who loses access. Members who are not in any other assigned group are disabled in AskCody and can no longer sign in.
- Check who keeps access. Members who are also in another assigned group stay active and keep the access that group gives.
- Only want to change access? Edit the group instead, as described in Change what a group can do.
How to remove the group
- Open the Microsoft Entra admin center.
- Go to Enterprise applications and open the application you use for AskCody provisioning.
- Select Provisioning, then Users and groups.
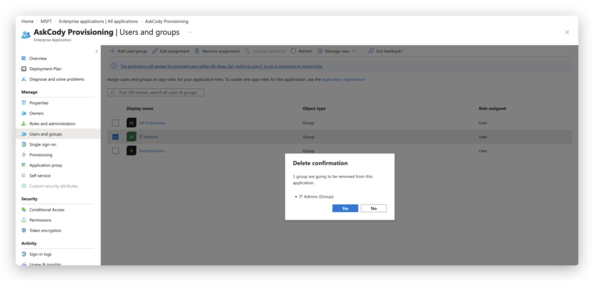
- Select the group and click Remove.
- Confirm with Yes.
What happens next
At the next sync cycle, AskCody removes the members who are no longer in scope. They lose access to the AskCody Platform. If you add them back to an assigned group later, they will be added back to the AskCody platform and regain their access back based on their group memberships.
To disable a specific user right away, use Provision on demand on that user. Microsoft supports this for users who are no longer assigned to the application.
Note: To remove one person instead of a whole group, remove them from the group in Entra ID. AskCody disables them at the next sync cycle in the same way.
How long does it take?
- With Provision on demand: a few minutes for the users you select.
- With the regular sync: a sync cycle starts about every 40 minutes. Each cycle usually finishes within 30 minutes when you sync only assigned users and groups. In practice, expect changes in AskCody within about an hour.
- Large groups: the first sync of a group with thousands of members takes longer, because AskCody creates or matches each user.
If users do not show up after you add a group
- Check that the users are direct members of the group, not members of a nested group.
- Check that each user has an email, User Principal Name, given name, and surname in Entra ID.
- Open Provisioning logs in the enterprise application and look for entries with the status Failure.
For more help, read Troubleshooting the user synchronization with Entra ID. If the issue persists, submit a ticket to AskCody Support.