![Logo - Secondary White-1.png]](https://help.askcody.com/hs-fs/hubfs/Logo%20-%20Secondary%20White-1.png?height=50&name=Logo%20-%20Secondary%20White-1.png)
Setting up a Reception
Visitor management often involves giving the visitor a pleasant and personal welcome as well as providing them with useful information about the building and the reason for their visit. These first steps of setting up a Reception in AskCody will focus on the simple and basic configuration of a Reception. Afterward, we will go into further detail about the advanced features and links to articles that will help you customize the system to support a unique visitor experience tailored to your needs.
In AskCody, we call it a reception, but it can also be referred to as a front desk or services desk.
A Reception in AskCody registers both individuals and groups as expected to visit for a specific time and date, for an easier check-in of the expected visitors, once they arrive.
Follow the steps below to configure your first reception. When you log in for the first time, a default reception is already created; you simply need to configure it so it fits your needs. Typically, at this point, it will be set up as a test reception for your project team in the implementation process.
- Log in to the AskCody Portal.
- On the left panel, click on the Admin Center.
- Go to Visitors and select Receptions.
- Edit the existing Default Reception.
- Fill in the information about the Reception you want to create.
- Finish by clicking Update.
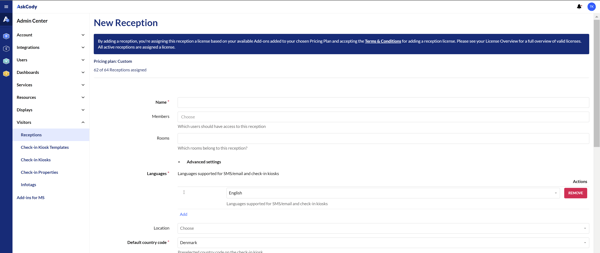
- Name is the name of the Reception
- Members are admin users who should manage the specific Reception. Admin users can be members of multiple Receptions and therefore manage multiple Receptions. If you added admin users in step 5: Getting started with Admin user management, these should be added as members of the specific Reception now. Memberships are, therefore, a way to separate access to multiple receptions for larger organizations. Memberships can also be managed and applied using Active Directory. Please see the next chapter to learn more about integrating AskCody with Active Directory.
- Room are the meeting rooms that allow for visitor registration at this specific Reception. To be able to register attendees as expected visitors for a specific meeting in a specific room, the room needs to be added here. By adding rooms here, you will be adding rooms to the reception. These are the rooms configured in step 6: Configuring meeting rooms in AskCody.
- Languages are the language options that should be available for the messages and Check-in Screens that are connected to this Reception. When adding a language, a set of default messages is automatically generated, which you can then customize later. More information about custom messages is presented later in this section.
- Location is the time zone settings that this Reception will use.
- Default country code is the country code that will be added by default to all hosts in this Reception.
- Email sender name is the name you are going to use, sending emails and confirmations to users registering visitors.
- Email to host determines whether the host of a visitor should receive an email when that visitor checks-in.
- SMS to host determines whether the host of a visitor should receive an SMS when that visitor checks-in.
- Email visitors after Check-in determines whether the visitors should receive an email after they have checked-in via SMS, email, Check-in screen, or the front desk personnel.
- SMS visitor after Check-in determines whether the visitors should receive an SMS after they have checked-in via SMS, email, Check-in screen, or the front desk personnel.
- Email visitors before their meeting determines whether the expected visitors should receive an email a few days, or hours before their expected arrival time.
- SMS visitors before their meeting determines whether the expected visitors should receive an SMS a few days, or hours before their expected arrival time.
- Notification before meeting: Set when pre-registered visitors (via the Visitors Add-in for Outlook) receive their arrival instructions by choosing to notify them a specific number of days or hours before their meeting.
- Automatic check-out allows you to set a time every day where the system will check-out all visitors who are still marked as on-site. This is a terrific way for users with access to the Visitor Portal to have a clean list of visitors at the beginning of every day.
- Days shown in the Check-in lists determine how much data should be visible to the users with access to the Visitors Portal. If you want the front desk to focus on the visitors that are expected on that specific day, it is recommended to select “Today only”. Users will still be able to see data for days in the future, but it will not be included in the main list of visitors and check-ins.
- Show notified status means that the notified status label will show on an expected visitor when the visitor has been notified via SMS or email about their arrival. The visitor status label will change from Expected to Notified. It is possible to enable/disable this label because labels can change the sorting and order in the Expected Visitor list.
- Print host name lets you print the name of the host on labels printed by users with access to the Visitors Portal. This will not affect the labels printed from the check-in screen.
- Print group name lets you print the name of the visitor group on labels printed by the users with access to the Visitors Portal. This will not affect the labels printed from the Check-in Kiosk.
- Print date and time lets you print the date and time of the check-in on labels printed by the users with access to the Visitors Portal. This will not affect the labels printed from the Check-in Kiosk.
- Print infotag lets you print one of the infotags that have been created for use in custom messages on labels printed by users with access to the Visitors Portal. This will not affect the labels printed from the Check-in Kiosk. Please see further down for more information on infotags.
- Identification name is the name that will be used for configuring an Active Directory user and host integration.
- Label print theme adds a custom logo to the labels printed by the users with access to the Visitors Portal if a theme has been created for you by the AskCody team. This will not affect the labels printed from the Check-in Kiosk.
Setting up a Check-in Screen Template
When setting up Check-in Kiosks, the first thing you need to do is set up a Check-in Kiosk Template. This allows you to control what information should be displayed and what features the Check-in Kiosk with this template should have enabled for your end-users.
A Check-in Kiosk can only have one Template at a time, but a Template can be used and inherited on multiple Kiosks at once. This enables you to change the displayed content on multiple displays without having to edit each Kiosk.
Please go through these steps to set up a Check-in Kiosks Template:
- Log in to the AskCody Portal.
- On the left panel, click on the Admin Center.
- In here, click Visitors and select Check-in Kiosk Templates.
- Edit the default template.
- Fill in the information and select the required features for the Check-in Kiosk to support the needs of your organization.
- Click Update to finish and save the Template.
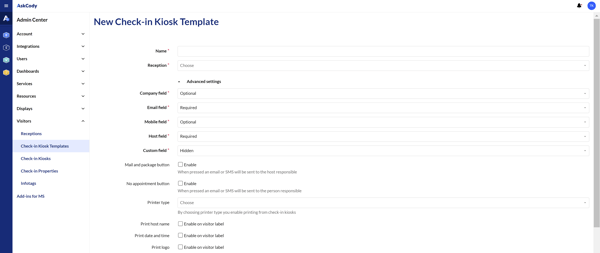
- Name is the name of the template. Create a name that is easy for you to remember, like Default Check-in Kiosk Template, Standard Check-in Kiosk, or something that represents the template.
- Reception is the reception that will be connected to Check-in Kiosk with this template. All check-ins from Check-in Kiosks with this template will be sent to this reception.
- The different fields are for visitors to write their personal information. The fields can be required or optional for the visitor to fill out or completely hidden from the Check-in Kiosks. The different fields are:
- Company, for the visitor to fill in their company information
- Email, for the visitor to fill in their email
- Mobile, for the visitor to fill in their cell phone number
- Host, for the visitor to select the host they are visiting
- Custom is a field for additional information that the visitor can provide
- Mail and package button is an additional button on the Check-in Kiosks for a courier or mailman to get in contact with someone who has been specified as the contact person for mail and packages in this reception.
- No Appointment button is an additional button on the Check-in Kiosks for visitors without a host to get in contact with someone who has been specified as the contact person for unexpected visitors at this reception.
- Printer type is the way the Check-in Kiosks will be printing labels when people have checked in via the Check-in Kiosks. If the Check-in Kiosk is set up using Google Chrome, that is the printer type you need to select.
- Print host name lets you print the name of the host on labels printed from the Check-in Kiosks. This will not affect the labels printed from the Visitors Portal.
- Print date and time lets you print the date and time of the check-in on labels printed from the Check-in Kiosks. This will not affect the labels printed from the Visitors Portal.
- Print logo lets you print your company logo on labels printed from the Check-in Kiosks if a theme with a logo has been selected. This will not affect the labels printed from the Visitors Portal.
- Print infotag lets you print one of the infotags that have been created for use in custom messages on labels printed from the Check-in Kiosks. This will not affect the labels printed from the Visitors Portal. Please see further down for more information on infotags.
- Theme lets you customize the look of the Check-in Kiosks and add a logo to the screen and the label. A theme must be created for you by the AskCody team. This will not affect the labels printed from the Visitors Portal.
Setting up a Check-in Kiosk
When a template has been set up and saved, it’s time to set up a Check-in Kiosk. Please go through these steps to set up a Check-in Kiosk.
- Log in to the AskCody Portal.
- On the left panel, click on the Admin Center.
- In here, click Visitors and select Check-in Kiosks.
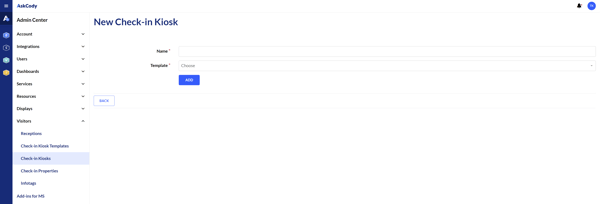
- Edit the default kiosk.
- Fill in the information and select the template that the kiosk should be using.
- Click Update to finish and save the Check-in Kiosk.
Deploying Check-in Kiosks
The AskCody Check-in Kiosk is available and compatible with multiple displays and devices. We recommend setting up the Check-in Kiosk on a device with a touch display that is compatible with at least Windows 10 and can run a Google Chrome browser.
To display an AskCody Check-in Kiosk on your selected hardware display, the device needs to be able to display the Check-in Kiosk URL. After that, you need to display the URL in full-screen mode. If you are using a touch display with Windows, you can follow this guide.
You can find the Check-in Kiosk URL by following the directions below:
- Log in to the AskCody Portal.
- On the left panel, click on the Admin Center.
- In here, click Visitors and select Check-in Kiosk.
- Click on the LTD (Large Touch Display) link of the kiosk you want to display and copy the URL.

Automatic removal of visitor personal identifiable information (PII)
AskCody Visitors comes with a functionality that automatically removes the personal identifiable information (PII) of registered visitors. In this way, you can assure your visitors that their PII will only be stored and used for a certain time frame.
*Note that all personal data in relation to visitors will be removed and replaced with Anonymized, but the visitors will not be removed from the system. This is to ensure that you still have historic data on the number of daily visitors.
You can change the settings for the automatic removal of visitor PII settings in the Admin Center by following these steps:
- Log in to the AskCody Portal.
- On the left panel, click on the Admin Center.
- In here, click Account and select Compliance.
Click to enable or disable Remove PII of Visitors to all Receptions. The functionality will apply to all receptions, and it is not possible to configure it per reception.

By enabling Remove PII of Visitors to all Receptions an option appears to specify the number of days until PII will be removed from visitors. The default is 31 days, and this can be set to be between 1 and 365 days.

If you want to apply the automatic removal of visitor PII, click Update and thereafter Proceed and update in the confirmation box. This will remove PII every midnight at UTC from visitors who have checked-in more than the specified number of days ago from all receptions.
Note that all personal data in relation to visitors will be removed and replaced with Anonymized, but the visitors will not be removed from the system. This is to ensure that you still have historic data on the number of daily visitors.
Advanced features for Visitors
If you have more extensive needs, you can learn more about the advanced features for Visitor Management here: