![Logo - Secondary White-1.png]](https://help.askcody.com/hs-fs/hubfs/Logo%20-%20Secondary%20White-1.png?height=50&name=Logo%20-%20Secondary%20White-1.png)
The development of this version of the AskCody mobile app is currently paused. We are working on replacing it with a new and improved mobile experience.
More details will be shared at a later stage.

The AskCody Mobile App
In today’s fast-paced work environment, all of your favorite tools get much better when you can take them with you and access them with ease on the fly. The AskCody App puts your workplace in your pocket offering the easiest and smartest way to find available space.
The app gives you a complete and simple overview of your whole workday and notifies if you have pending meeting invitations as well as informing you if no rooms have been added to your meeting - ensuring that you and your co-workers always have a place to meet and collaborate.
With the AskCody App, you get to:
- See your agenda for the day and info on upcoming meetings. You’ll have a full overview of your workday.
- Search for available meeting rooms/workstations across your entire workplace.
- Filter your search based on amenities, equipment, purpose, and services available.
- Book and edit meetings or add meeting rooms to bookings with no room.
- Plan with ease by seeing attendee availability before inviting them to the meeting.
- Personalized location selection – decide which area is the most important to you and in which order.
- Book workstation independently from the availability status in Outlook.
- Notification on pending meeting invitations and missing meeting rooms.
Installing the Mobile App (IT Administrators)
The AskCody App integrates seamlessly with Microsoft Exchange and the entire AskCody Platform. The App inherits information set on rooms, equipment, settings, scheduling rules, and policies from AskCody combined with information from Exchange resources. See the diagram below to get the full overview.

Requirements for using the AskCody Mobile App:
The AskCody Mobile App is designed to work with an EntraID Integration, as the mobile app authorizes users through Microsoft’s EntraID. Therefore, if you are using an EntraID to manage your users with AskCody, you should be eligible to use the mobile app without further configuration. Simply log in to the mobile app using your Microsoft credentials.
Device requirements
For iPhone, the AskCody Mobile App is supported on the latest two major software versions (fx. iOS 15 and 16). For Android, the mobile app is supported in version 9 or newer.
How to install the AskCody Mobile App
There can be a lot of ways to distribute, deploy, or assign apps to employees; whatever method you choose is up to you. In the following section, (Employees) explains the manual installation process without a centralized deployment of the app.
Installing the Mobile App (Employees)
Follow the steps below to download and install the AskCody Mobile App.
|
|
2. Open the AskCody Mobile App when it is finished downloading. |
3. Type in your Microsoft email, the same you use when logging into Outlook. |
 4. Type in your password for your Microsoft account. 4. Type in your password for your Microsoft account. |
|
|
 1. iPhone: Open App Store and search for AskCody or click on

You have now installed the AskCody Mobile app and can get started using it. Learn how to use the Mobile App and watch videos in the next section.
How to use the Mobile App
We highly recommend watching this short Introduction video of how to use the Mobile App and learn the benefits of using it.
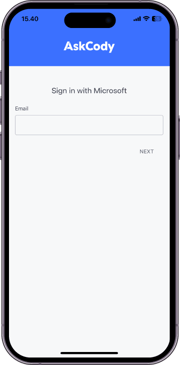
1. Sign in to the AskCody Mobile App
To sign in to the AskCody Mobile App, you need to use your own Microsoft Office 365 credentials. When you open the app, enter your Office 365 email address and tap "next". Hereafter, you will get redirected to enter your Office 365 password.
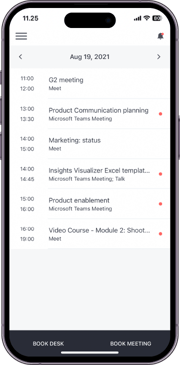
2. Dashboard
The initial screen gives a complete overview of your workday, showing meetings and events organized in a simple list. This gives you the ability to always stay updated no matter if you are at the office, on the train, or just want to check your schedule in the morning. You can easily change the date by tapping the arrows adjacent to the date, or tap the date directly to choose a specific day in the past or future.
3. Book a meeting
The true timesaver with the Mobile app is the superfast way of booking and checking for available rooms. No need to run up and down the hall to find a place to collaborate. Simply tap “Book meeting” and “Add room”, and a list of rooms available will be presented based on the previously chosen location.
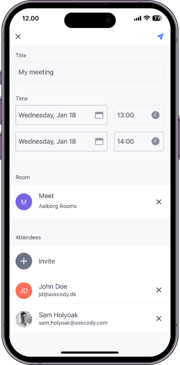
To book a meeting, tap “Book meeting” at the bottom of the App, and fill in a title. When adding attendees, you will get the most recent contacts and see their availability for the meeting time. You can always use the search bar at the top to find a specific person. Tap the back-arrow to add the selected contacts to the meeting invitation.
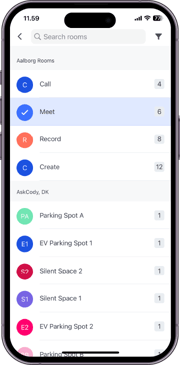
Let’s add a room similar to what you saw before. We could add a room by simply choosing one from the list, but if you need a room with specific equipment, like a projector or video conference, or a room with a specific purpose, you can filter based on that. The App contains the same intelligent filtering capabilities as the AskCody Bookings add-in for Outlook and the app also inherits settings, scheduling rules, and policies from AskCody. The capacity is automatically set to match the number of attendees you chose to add to your meeting before - including you as the organizer. To apply this filter to our meeting room search, tap the back arrow and choose a room. To send the meeting, tap the icon of a paper plane in the top right. It will now appear in your daily meeting overview, where you can always tap the meeting and apply any changes you like.
4. Notifications
In the Dashboard, notifications indicate that you either have a pending meeting invitation or haven’t added a room for your own meeting.
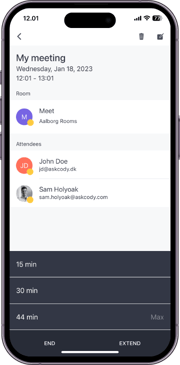
If we tap the meeting directly from our daily meeting overview, we will get a more detailed view of that meeting. From here, we are presented with the possibility to decline, report tentative, or accept. Let’s accept this meeting invitation. As you can see, the red dot now disappears. If we look at the bell-icon, we still see a red dot. This means that we might have additional future pending meeting invitations or lack space for a meeting we organize. For example, this meeting lacks a place to meet, and we could add a room by tapping the edit button in the top right.
5. End & extend
Finally, let’s see how easy it is to end a meeting to free up the meeting room for others to use or extend your meeting and the room if you just need a little more time to finish your meeting. Tap an ongoing meeting and a black bar will appear from the bottom of the screen and present you with the option to either extend or end. If you choose to extend, you have four time-intervals where the option in the bottom is the maximum amount of time you can extend the meeting before going back-to-back with the next meeting occupying the room.
Read more about using the app, element to element, in this article.