![Logo - Secondary White-1.png]](https://help.askcody.com/hs-fs/hubfs/Logo%20-%20Secondary%20White-1.png?height=50&name=Logo%20-%20Secondary%20White-1.png)
AskCody Displays is a small meeting room screen showing daily meeting activities and enabling employees to book the meeting room directly on the display.
This makes it easier than ever to optimize your meeting room utilization, reduce office friction, and give employees an overview of meetings and room reservations in the workplace. The Displays prevent meeting interruptions and booking misunderstandings.
Setting up a Meeting Room Display template
Setting up Meeting Room Displays, the first thing you need to do is to set up a room display template. This allows you to control what information should be displayed and what features a Meeting Room Display should have enabled for your end-users.
A Meeting Room Display can only have one template at a time, but a template can be used and inherited on multiple displays at once. This enables you to change the displayed content on multiple displays without having to edit each individual display.
Please go through these steps to set up a Meeting Room Display template.
- Log in to the AskCody Portal.
- Click on the Admin Center ⚙️ on the left panel.
- In the Admin Center, click Displays and select Display Template.
- Now, either edit the default template or add a new one by selecting "Add".
- Fill out the information and select the required features for the room display to support the needs of your organization.
- Click Add to finish and save the template.
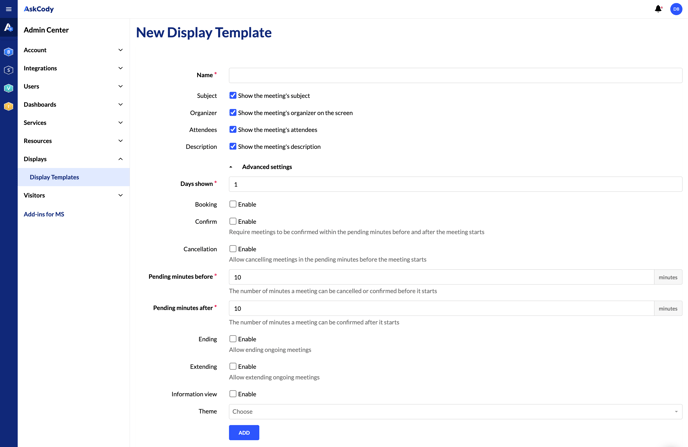
Name is the name of the template. Create a name that is easy for you to remember, like default room display template, standard room, or something that represents the template.
Enable Subject to display meeting subjects on the room display.
Enable Organizer to display the organizer of a meeting on the room display.
Enable Attendees to display attendees to a meeting on the room display.
Enable Description to display the meeting description on the room display.
All of above mentioned features and data come from the Outlook meeting invitation.
Days shown are the number of days ahead that the room display shows booking and reservations.
Enable Booking to activate ad-hoc bookings from the room display.
Enable Confirm to activate room confirmation (also known as auto-release) for meetings. This is to prevent ghost meetings from happening, and a feature to disable no-shows. This requires meetings to be confirmed within the pending minutes before and after the meeting starts. If meetings are not confirmed, the event duration in the room's calendar will be ended immediately after the time range defined in the pending minutes before and after settings, thus automatically releasing the room for others to use.
Enable Cancel to activate the cancellation of meetings within the pending time of a meeting. Meetings can’t be canceled outside of the pending time.
Pending time (pending minutes before and after) is the amount of time before the meeting starts, which can be canceled or confirmed. Likewise, it’s the amount of time after the meeting started, it can be confirmed or canceled, before it automatically ends (killing no-shows).
Enable Ending to allow ending ongoing meetings to optimize meeting room utilization that meetings end early.
Enable Extending to allow extending ongoing meetings.
Enable Information View to display room information on the room display and activate error reporting of faulty equipment.
Theme allows you to select a specific theme for your room displays to be inherited by all displays using this template. If no theme is selected, the default is automatically selected.
Now you need to attach the template to the display you wish to show it.