![Logo - Secondary White-1.png]](https://help.askcody.com/hs-fs/hubfs/Logo%20-%20Secondary%20White-1.png?height=50&name=Logo%20-%20Secondary%20White-1.png)
To follow this guide, please make sure that you have followed the steps from this article. This guide contains instructions for how to configure your organizations Active Directory Server Integration and enable automatic user and hosts synchronization on your AskCody account.
Setting up the Active Directory Server Integration configuration
Before setting up the configuration, please make sure that a service account with access to the necessary groups in the Active Directory is created.
The Active Directory Server Integration configuration file (config.json) consists of three segments:
- The general integration info and credentials (mandatory)
- The user integration info
- The host integration info
Below is an explanation of each segment as well as a guide on how to create the correct structure based on different use cases for the Active Directory Server Integration.
*TIP: It is recommended to use Notepad++ when editing a config.json file.
Difference between users and hosts
When setting up the Active Directory Server Integration configuration, it is important to distinguish between users and hosts. In AskCody services, users are accounts with access based on roles and memberships, for example, Add-in Users and Receptionists. Hosts, on the other hand, are only used in AskCody Visitors.
The configuration .json file
A sample configuration file is automatically generated after installation and the initial run of the service. The config.json file is placed in the following folder on the server:
%USERPROFILE%\AppData\Roaming\AskCody\ActiveDirectory\ForwardingService
The configuration file is written in JavaScript Object Notation (JSON), a lightweight alternative to XML.
Templates and examples
Attached to the bottom of this article are the following three templates:
- A config file for both user and host integration
- A config file for user integration only
- A config file for host integration only
Also attached to the bottom of this article are a few examples of how to structure a config file with different levels of complexity.
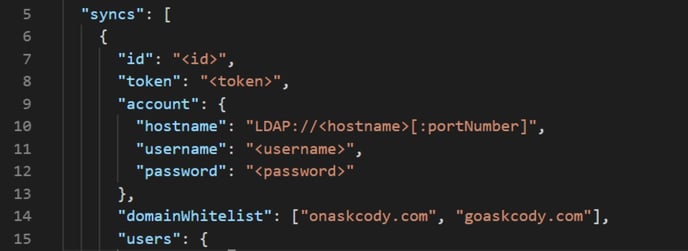
Segment 1: General integration info and credentials
This segment is a mandatory part of every config file and consists of the following lines of information:
- "configured": This must always be set to the value of true.
- "endpoint": This is the endpoint of the integration in AskCody's platform and must be pointing at the region where the customer is signed-up
Info
Depending on the region where the AskCody customer is signed-up the following endpoints are used:
US region: https://sync.goaskcody.com/active_directory/
EU region: https://sync.onaskcody.com/active_directory/
- "interval": This is the time interval between each integration and is by default set to 3600 (measured in seconds which correlates to 1 hour).
- "sync"
- "id": The name of the integration in the AskCody Management Portal → Admin Center → Integrations → Active Directory Server Integration.
- "token": The token generated in AskCody Management Portal → Admin Center → Integrations → Active Directory Server Integration (this is the link between service and AskCody).
- "account":
- "hostname": This is the address on the AD-server. LDAP:// must be included in front of the address.
- "username": The username for the service account that can access user data in AD. If the service account with access to AD is the same user that is running the service on the windows server, the username should NOT be added to the config file.
- "password": The password for the service account that can access user data in AD. If the service account with access to AD is the same user that is running the service on the windows server, the password should NOT be added to the config file (the password line should be deleted from the config file).
Segment 2: User integration info
- "users":
- "groups": This is the name(s) of the AD security group(s) that should be included in the integration of users. If all groups are a part of the same overall group, then you only have to write the name of the overall group.
- "attributes": This is specifically for customers that want to use a specific attribute from AD as the cost center ID for Services add-in users.
- "tags": Tags are used to assign access roles, reception membership, and provider membership to the AD security group(s). (Click here to learn more about access roles).
Segment 3: Host integration info
- "hosts":
- "groups": This is the name(s) of the AD security group(s) that should be included in the integration of users. If all groups are a part of the same overall group, then you only have to write the name of the overall group.
- "tags": Tags are used to assign the users in the AD security group(s) as hosts to the specified reception(s).
Below is a list of all the tags used to assign user roles and memberships. For examples of how to assign these roles in the configuration file, please refer to the examples attached at the bottom of this article.
User Roles
Below is a short description of the roles, if you wish the full description of the role and see the roles in a role hierarchy, see this article.
- "ROLE_OWNER", - grants access to all functionality in the AskCody Portal.
- "ROLE_MEETING_USER", - grants access to all the AskCody Add-ins in Outlook.
- "ROLE_MEETING_DELEGATE", - grants access to the Services add-in on behalf of other accounts within the organization.
- "ROLE_MEETING_ADMIN", - grants access to all Services functionality in the Admin Center and Web Portal.
- "ROLE_MEETING_PROVIDER", - grants access to requests, items/services, and terms in the Services Web Portal.
- "ROLE_MEETING_ACCOUNTANT", - grants access to cost centers and reports in the Services Web Portal.
- "ROLE_ROOMFINDER_SEARCH_SPECIFIC_ROOMS", - grants access to search specific rooms in the Bookings add-in.
- "ROLE_ROOMFINDER_MANAGER", - grants limited access to Resources in the AskCody Portal.
- "ROLE_ROOMFINDER_ADMIN", - grants access to all Resources functionality in the AskCody Portal.
- "ROLE_TODAY_MANAGER", - grants limited access to the Displays section of the Portal.
- "ROLE_TODAY_ADMIN", - grants access to all Displays functionality in the Portal.
- "ROLE_ACTIVITYVIEW_MANAGER", - grants access to Dashboards section of the Portal.
- "ROLE_ACTIVITYVIEW_ADMIN", - grants access to all Dashboards functionality in the Admin Center and Management Portal.
- "ROLE_WELCOME_RECEPTIONIST", - grants access to contacts and visitors in the Visitor Web Portal.
- "ROLE_WELCOME_ADMIN", - grants access to all Visitor's functionality in the Admin Center and the Web Portal.
- "ROLE_CONNECT_ADMIN", - grants access to all integration functionality in the Admin Center.
- "ROLE_WORKPLACE_CENTRAL_USER", -grants access to all AskCody Central functionality in the Portal.
- "ROLE_INSIGHTS_ADMIN", - grants access to all AskCody Insights functionality in the Portal.
User Memberships
- "COST_CENTER_GROUP_MEMBERSHIP:<ID>", - assigns them to the Services cost center group with the given ID.
The <ID> should contain the Identification name defined in Active Directory for a custom attribute that specifies the Cost centers of the organization. - "DELIVERY_PROVIDER_MEMBERSHIP:<ID>", - assigns them to the Services provider with the given ID.
The <ID> should contain the Identification name defined in the Provider's settings in the AskCody Management Portal. Here is an example:
- "RECEPTION_MEMBERSHIP:<ID>", - assigns them to the reception with the given ID.
The <ID> should contain the Identification name defined in the Reception's settings in the AskCody Management Portal. Here is an example:
Host Assignments
- "RECEPTION_ASSIGNMENT:<ID>", - assigns them to the reception with the given ID.
The <ID> should contain the Identification name defined in the Reception's settings in the AskCody Management Portal. Here is an example:

Domain White-listing
In the Active Directory Server Integration, it is possible to specify the exact domains that should be included in both user and host integration. If no domain white-list is added, all users from the added AD groups will be synced regardless of user domains. In some cases, it is preferred that only the main company domain is included. One example could be that consultants working in the company with an external mailbox domain should not be part of the company host lists for visitor management. Adding ex. goaskcody.com as the white-listed domain will exclude users having a goaskcody-ext.com mailbox.
To add whitelisted domains, please insert: "domainWhitelist": ["INSERT DOMAIN"],
Please make sure that you are running the newest Active Directory Server Integration version since this feature is only supported from version 2.4 onwards.
Start the service
After configuring the service, the next step is to start and run it, which you can do by double-clicking the shortcut called "AADFS" on your desktop, and then double-clicking on the "Start service" shortcut within this folder.
Alternatively, you can open "Services" on Windows by typing "Services" on the Start Menu search bar, and then from there finding "AskCody Active Directory Forwarding Service". Then proceed to double click on it and start the service.
After starting the service, it will run the configuration defined, and start synchronizing users and/or hosts from your organization's Active Directory into AskCody.
Configuration examples
- Config Template (host and users).json (2 KB)
- Config Template (hosts).json (1 KB)
- Config Template (users).json (2 KB)
- Host sync example.json (1 KB)
- User sync example.json (1 KB)
- User and host sync example.json (2 KB)