![Logo - Secondary White-1.png]](https://help.askcody.com/hs-fs/hubfs/Logo%20-%20Secondary%20White-1.png?height=50&name=Logo%20-%20Secondary%20White-1.png)
As your organization expands and more locations are added, it is necessary to assign different product licenses to those new locations to be able to successfully activate and use AskCody products in them.
This article will explain how to view and export license distribution for all locations, or a location in particular. You can click on the following titles to easily navigate through it:
License Distribution for all locations
Data view
As the number of locations grows, it may become necessary to see the license distribution on each location to easily understand the usage of AskCody licenses across your organization.
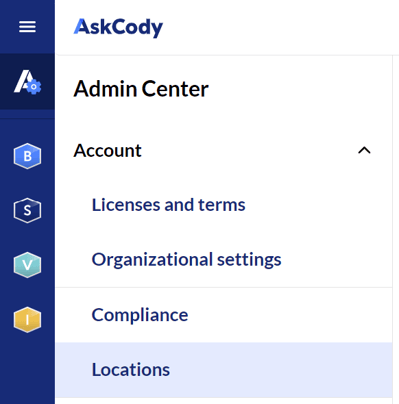
To see the license distribution among locations, you can login to the AskCody Management Portal and on the Admin Center, click on Account, and then on Locations:
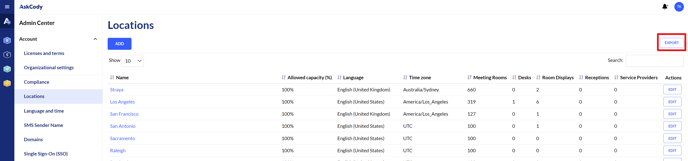
In here, you will be able to see the license distribution across locations and sort the data table by clicking on the column title to easily identify relevant locations. In the following example, we have sorted the table by number of meeting rooms:

Info
For Receptions and Service Providers to appear in their corresponding location, it is important to assign a Location to them. To make sure this is set up correctly, please follow these steps:
Receptions
Service Providers
Data export
In order to easily manage and create reports about the license distribution on your organization, it is possible to make a data export from the Locations page, which includes all the information relevant to the locations, including the license distribution across them.
To perform a data export of license allocation by locations, you can log in to the AskCody Management Portal and on the Admin Center, click on Account, and then on Locations:
In here, at the top right corner of the table, you should see an "Export" button:
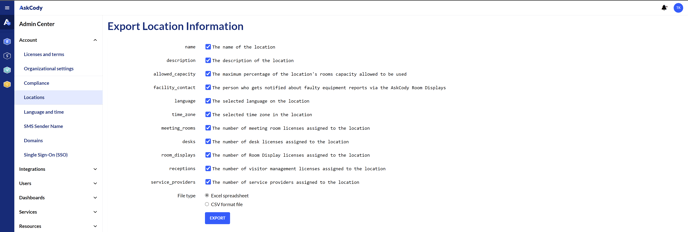
By clicking on it, you will see a list of the available Location properties for export. In here, you may select all the ones you would like to include on your report, and also select the file format you would like to have. By default, all the available fields and the Excel spreadsheet format are pre-selected.
After selecting the fields and file format you would like to export, you can proceed to click on "Export", and a file on the selected format will be downloaded to your device.
License Distribution for a specific location
Data view
As the number of locations grows, it may become necessary to see the license distribution on each location to easily understand the usage of AskCody licenses across your organization.
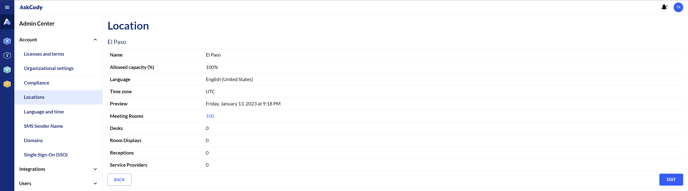
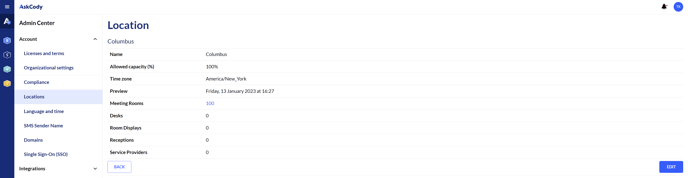
To see the license distribution among locations, you can login to the AskCody Management Portal and on the Admin Center, click on Account, and then on Locations.
In here, you will be able to see the license distribution across locations. In order to see a particular location, you can click on its name, and then you will be able to see information relevant to it. At the bottom of the information table, you will see the different licenses and products assigned to that location.
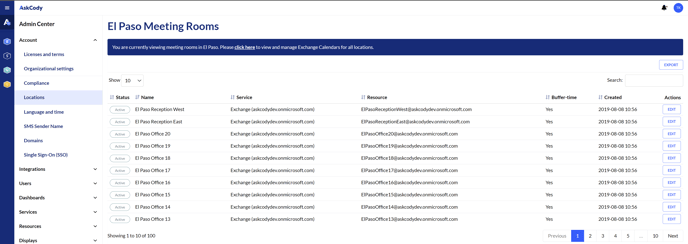
When having products assigned to a location, you can click on the number, and then you will be able to see the products of that type, assigned to that location:
In this example, by clicking on the number of Meeting Room inside the Aalborg location, we will be able to see the Meeting Rooms assigned to that specific location:
Data export
In order to easily manage and create reports about the license distribution on a specific location on your organization, it is possible to make a data export from the corresponding page, which includes the licenses assigned to it.
In order to perform a data export of license allocation on a specific location, you can log in to the AskCody Management Portal and on the Admin Center, click on Account, and then on Locations.
In here, you will be able to see the license distribution across locations. In order to see a particular location, you can click on its name, and then you will be able to see information relevant to it. At the bottom of the information table, you will see the different licenses and products assigned to that location.
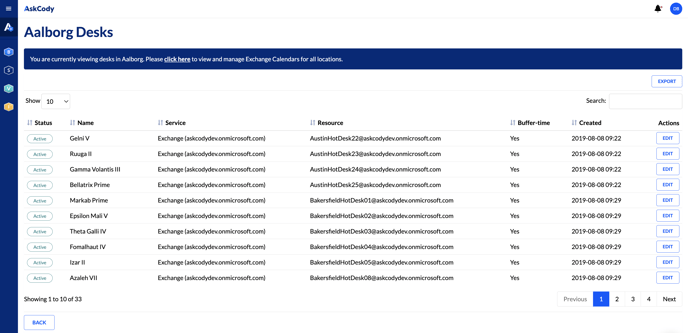
When having products assigned to a location, you can click on the number, and then you will be able to see the products of that type, assigned to that location:
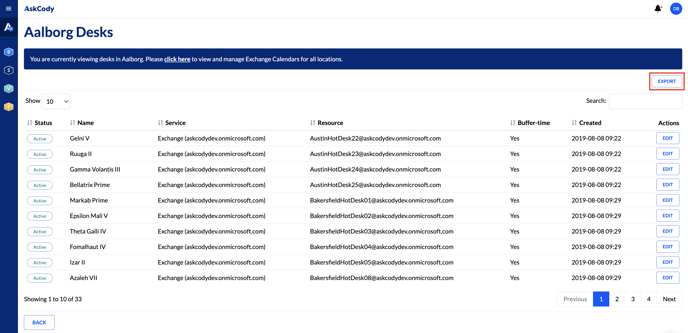
In this example, by clicking on the number of Desks inside the Aalborg location, we will be able to see the Desks assigned to that specific location:
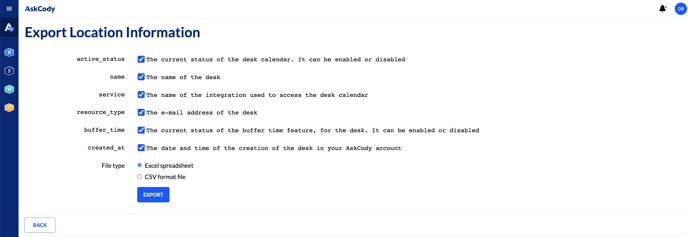
In here, at the top right corner of the table, you should see an "Export" button:
By clicking on it, you will see a list of the available Resource properties for export. In here, you may select all the ones you would like to include on your report, and also select the file format you would like to have. By default, all the available fields and the Excel spreadsheet format are pre-selected.
After selecting the fields and file format you would like to export, you can proceed to click on "Export", and a file on the selected format will be downloaded to your device.