![Logo - Secondary White-1.png]](https://help.askcody.com/hs-fs/hubfs/Logo%20-%20Secondary%20White-1.png?height=50&name=Logo%20-%20Secondary%20White-1.png)
With the Visitor Management Portal, you can check-in visitors, check-out visitors, get a complete overview of who is coming when, who the visitors have a meeting with, automatic notifications to the host of the meeting when a visitor has checked-in.
With this tool, you can easily manage the flow and planning of visitors for a whole day and the day after.
When using the Visitor Management Portal, there are three core features to learn about: Check-ins, Visitors, and Hosts. These three features are explained in the next part of this article.
Check-ins
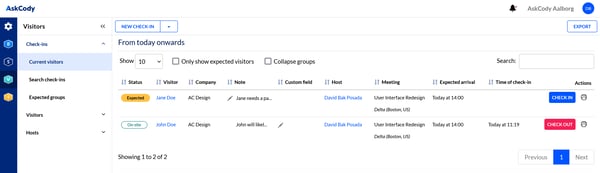
Check-ins are the dashboard and the front face of the Visitor Management Portal, and the start screen of this module. The key element of the dashboard is the list of current visitors, where all expected and on-site visitors are shown. For each visitor, you can see all the information about that visitor, check-in expected visitors, check-out on-site visitors, and print out labels with the visitor's information. Below is a list explaining each column in the current visitor list.
- Status is the current status of the visitor. The visitor can be expected, notified, on-site, or off-site.
- Visitor is the name of the visitor.
- Company is the company of the visitor.
- Note is for comments left by the host or user when registering the visitor.
- Custom field is a text field that users with access to the Visitor Management Portal can edit for internal communication. This is for additional information like further notes.
- Host is the host that has registered the visitor.
- Meeting is the title of the meeting that the visitor is registered to attend.
- Expected arrival is the expected arrival time of the visitor.
- Time of check-in is the time and date of the visitor being check-in to the system.
- Actions are the way users with access to the Visitor Management Portal can interact with the visitor. For expected visitors, they can be checked in, on-site visitors can be checked out, and labels can be printed for all visitors.
The search for check-ins page allows you to specify information about a check-in you are looking for and search among all the check-ins in the reception.
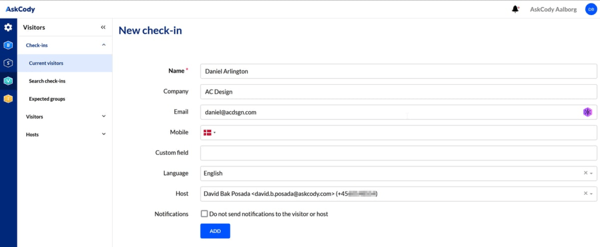
Next to the Check-ins tab is the Add button that lets users with access to the Visitor Management Portal create check-ins, visitors, and expected visitors manually if needed.
Visitors
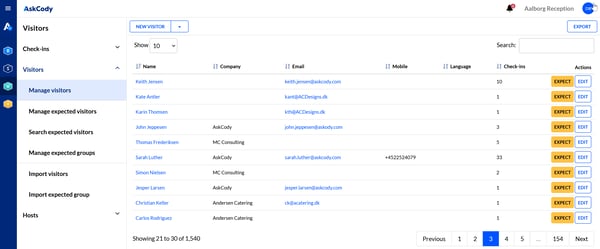
The Manage Visitors page is the complete list of visitors. Here, the name, company, email, mobile number, preferred message language, and the number of historic check-ins are stored for each visitor. Also, the users with access to the Visitor Management Portal can quickly mark a visitor as expected without having to use the Visitors+ add-in for Outlook.
The Manage expected visitors page shows you a list of all currently expected visitors and allows users with access to the Visitor Management Portal to view and edit each one.
The Search expected visitors page lets you search for expected visitors who are expected within a certain timeframe.
The Manage expected groups page shows you a list of all currently expected groups and allows users with access to the Visitor Management Portal to view and edit each one.
The import pages let you import expected visitors or groups by uploading a CSV file with the required information.
Hosts
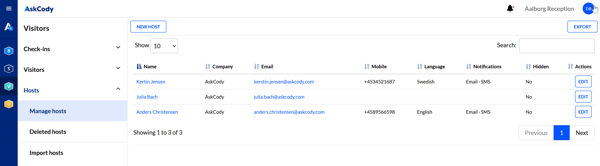
The Manage hosts page is the complete list of hosts. Here, the name, company, email, mobile number, preferred message language, and notification settings are stored for each host. This information is typically configured as part of the integration of users from EntraID, and updates automatically. If such an integration is set up, all changes made manually to the host in the Visitors Portal will be overwritten.
But in the implementation and test phase, feel free to add the hosts manually, because the integration and the synchronization of users and hosts have not yet started.
The View deleted hosts page is a list of all the hosts that have been removed from the host list of this reception. Here, the users with access to the Visitor Management Portal can undo a deletion of a host if needed.
The import page lets you import hosts by uploading a CSV file with the required information, as an alternative to the integration with EntraID.
Note:
When importing hosts via a CSV file, the required information on the file is two columns called name and email.
Additionally, you can add more information such as: company, mobile number, custom, language, and if you have any name duplicates, you can add a differentiator. Read more here.
Setting up custom messages and text
When you send an email or an SMS to a visitor, you want the content of that message to be unique and informative so that the visitor feels welcome and has all the information that they need in order to fulfill the purpose of their visit. Therefore, the next step for setting up your AskCody Visitor Management solution is to customize the messages and text (also called Check-in Properties) that the visitor will see when visiting your organization.
Please go through these steps to customize your Check-in Properties:
- Log in to the AskCody Management Portal.
- Navigate to the Admin Center ⚙️.
- Go to Visitors and select Check-in Properties.
- Select what property you want to customize.
- Replace the existing text and click Update.
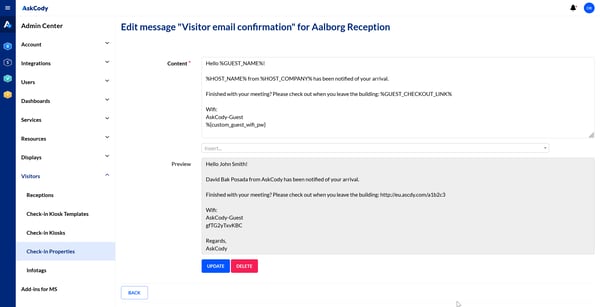
The custom properties are split into four types: Screen, Terms, Email, and SMS.
- Screen properties are the text displayed on the Check-in Kiosk and can be customized to include a unique greeting.
- Terms properties are the text that will be shown when the visitor clicks on the terms and conditions of my visit link on the Check-in Kiosk. Here you can specify the building's security policies, non-disclosure agreements, etc. If you have defined your own terms and conditions, the system will automatically require that the visitor accepts these before they are able to check-in.
- Email properties are the emails that will be sent to visitors and hosts.
- SMS properties are SMS that will be sent to visitors and hosts.